


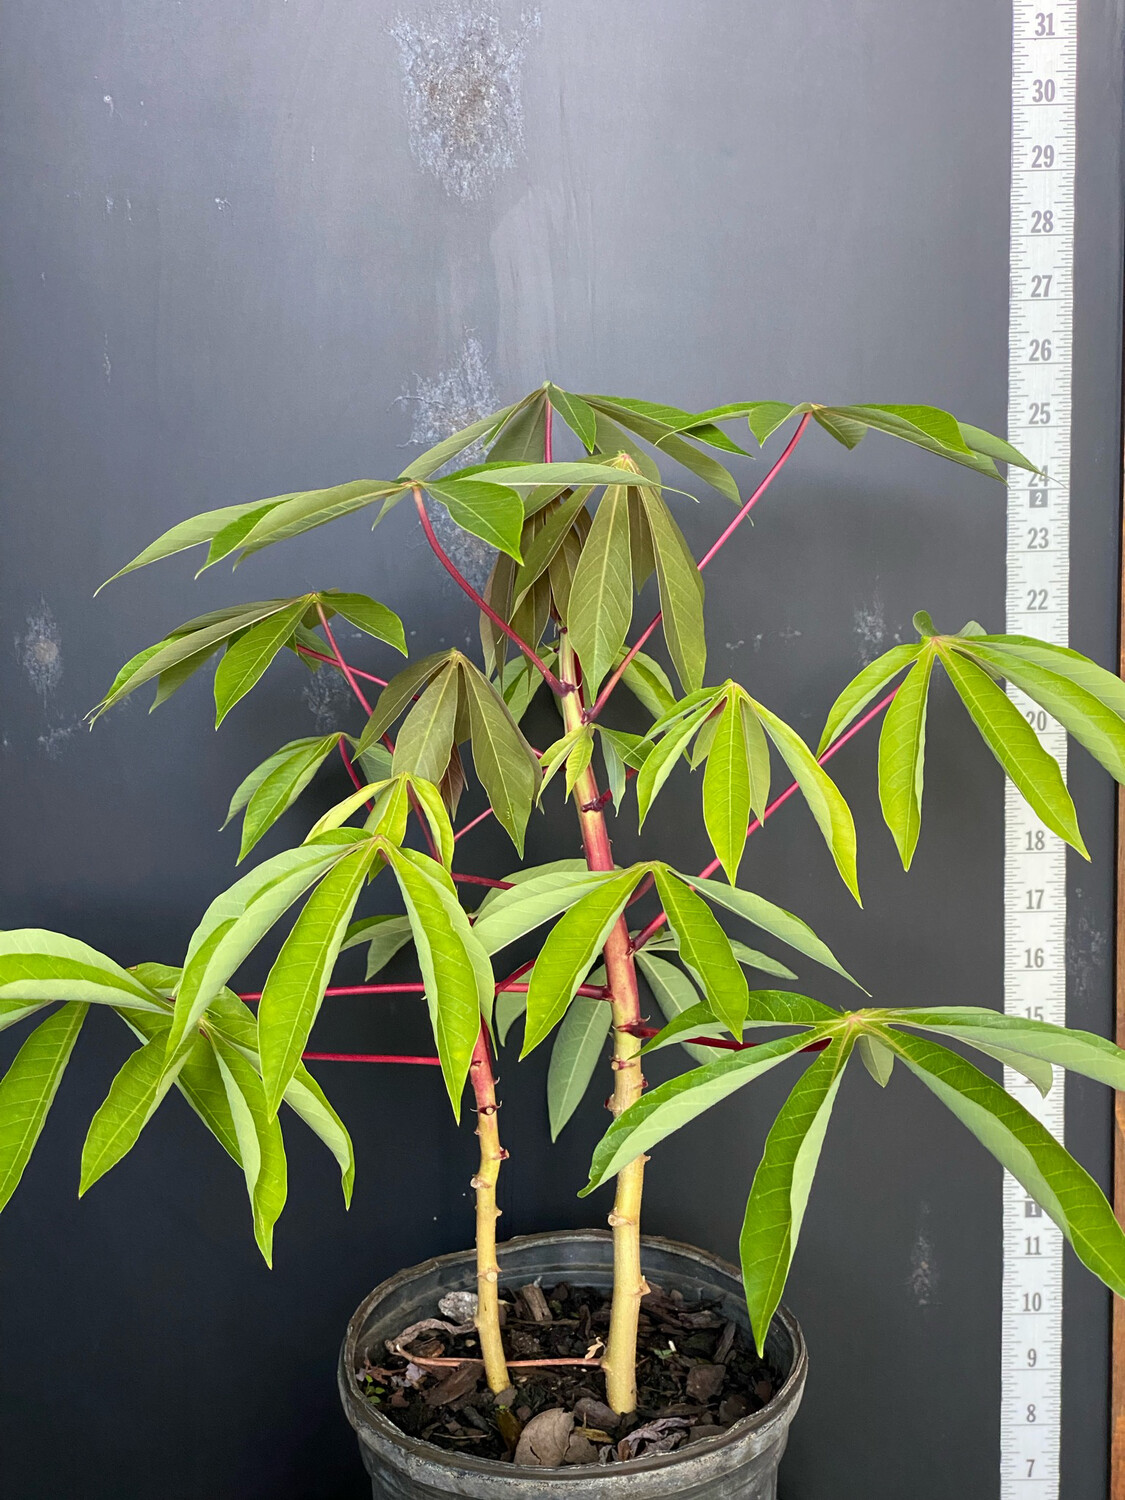
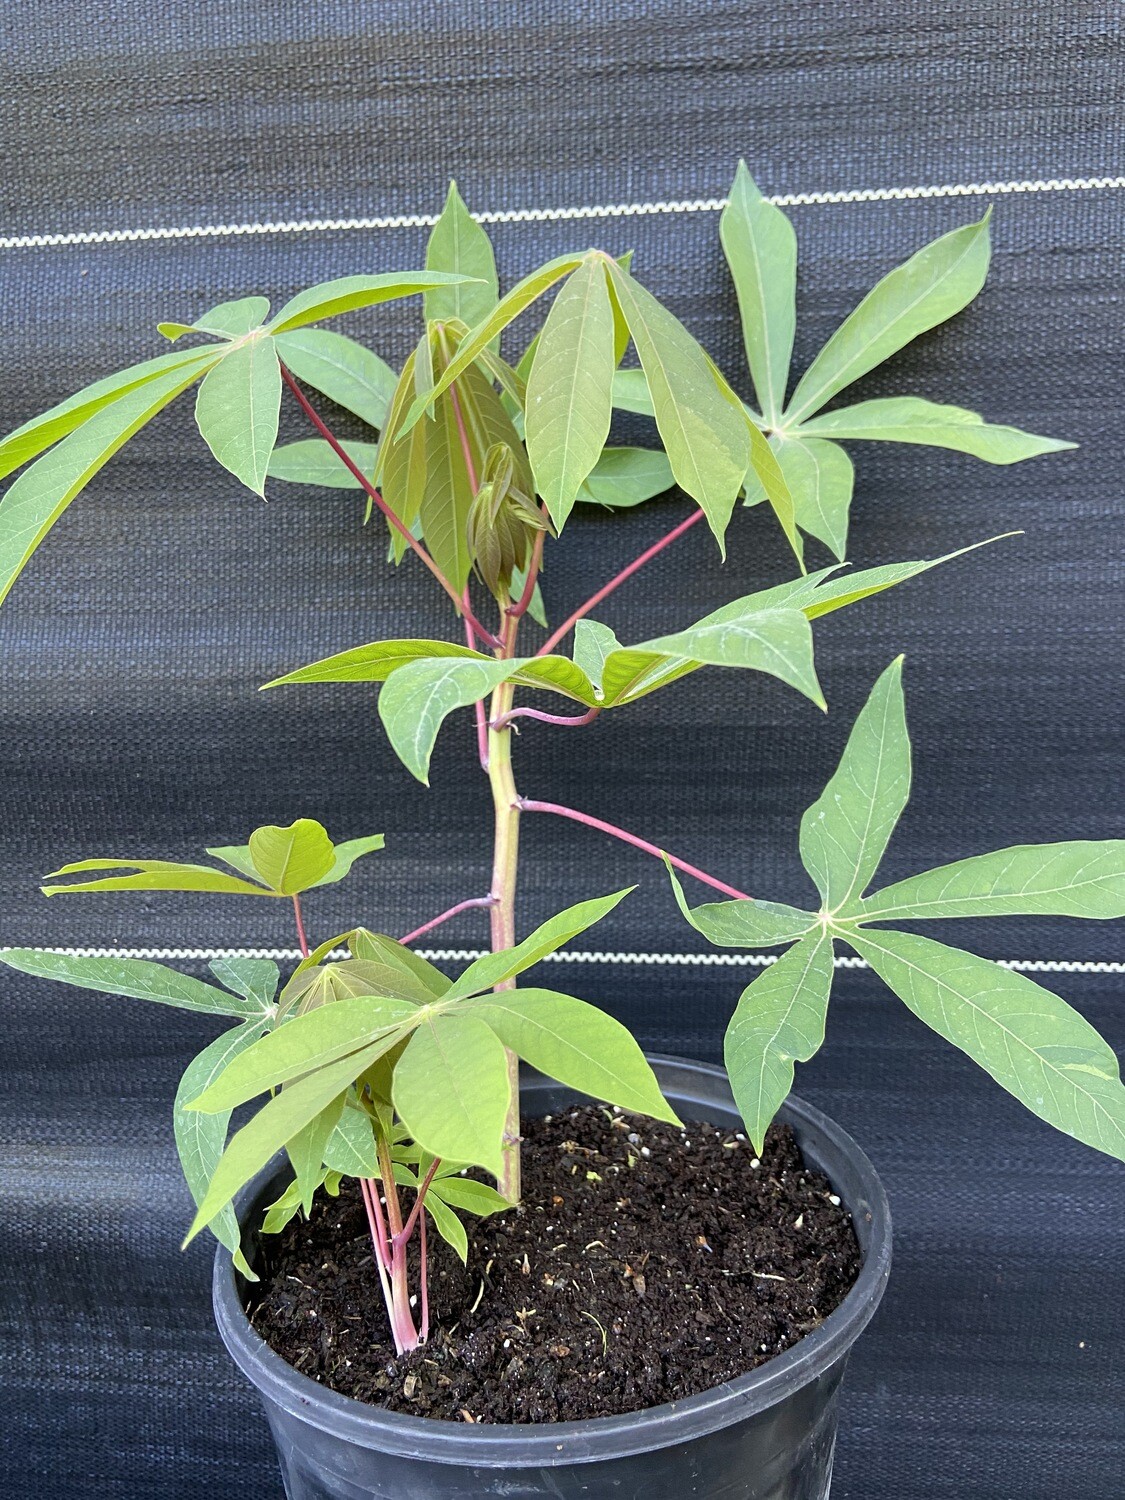
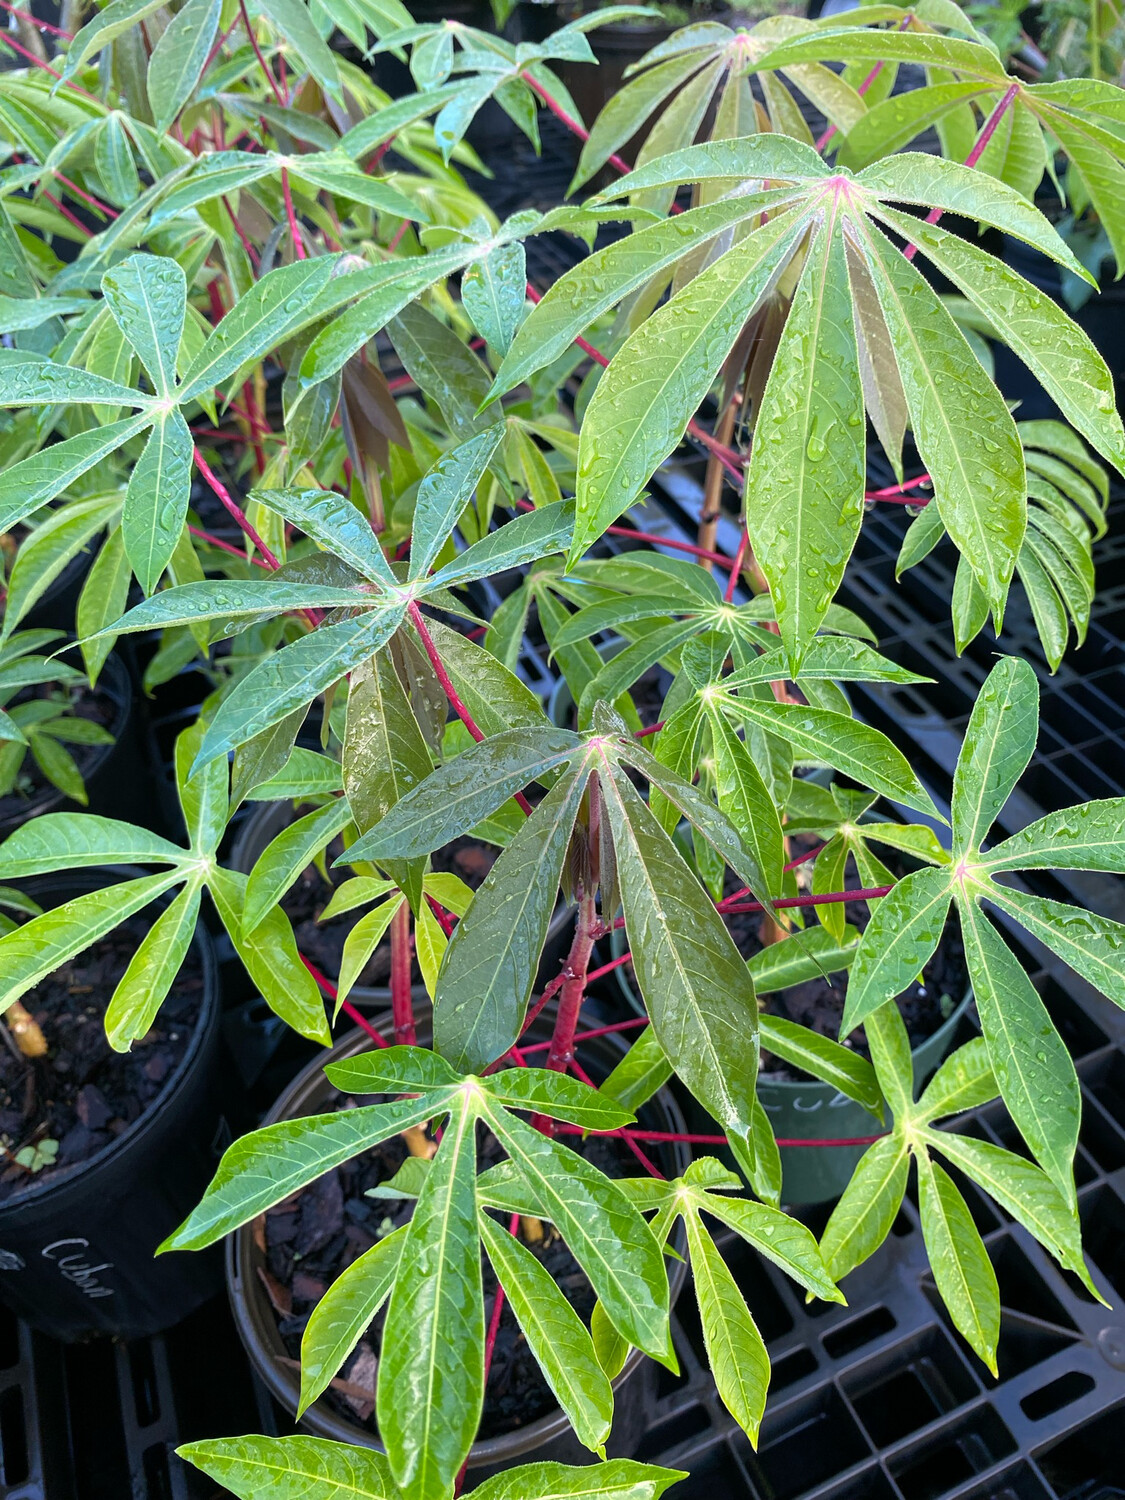
🌿 Cuban Cassava — Classic Caribbean Yuca for Boiling, Mojo & Hearty Cooking
Manihot esculenta — Traditional White-Stem Caribbean Type 🍠🌴
Firm, flavorful and built for the cooking pot, this traditional Caribbean cassava delivers the dense texture and savory yuca flavor generations of island kitchens have counted on.
From garlicky yuca con mojo to sancocho, bouillon, soups, stews and golden yuca fries, Cuban Cassava is the homegrown staple for gardeners who want authentic Caribbean cooking straight from the landscape.
It is also one of the most useful tropical food crops a grower can plant. Once established, cassava handles Florida heat, seasonal drought and modest soils with impressive resilience—while producing edible storage roots and future planting material from the same crop.
A Note About the Name
At GreenDreams, Cuban Cassava identifies our traditional white-stem Caribbean selection. It is best understood as a regionally maintained landrace type, not a formally registered or genetically uniform commercial cultivar.
Caribbean cassava selections have been preserved through generations of growers choosing plants for desirable traits such as:
- Firm cooking texture
- Reliable root production
- Strong stems for propagation
- Heat and drought performance
- Familiar savory yuca flavor
- Adaptability to local soils and seasonal conditions
Some natural variation in stem color, branching and root shape may occur from plant to plant. That diversity is part of the story—not a defect.
🌿 Quick Facts — Cuban Cassava
| Category | Details |
|---|---|
| Botanical Name | Manihot esculenta |
| GreenDreams Selection | Traditional white-stem Caribbean type |
| Common Names | Cuban cassava, yuca, manioc, mandioca |
| Plant Family | Euphorbiaceae |
| Plant Type | Tropical perennial shrub grown for edible storage roots |
| Size at Sale | Ships established in a 1-gallon nursery container; top height varies seasonally |
| Estimated Age | Approximately 3–9 months, depending on season and nursery pruning |
| Mature Height — Unpruned | Approximately 6–10 ft |
| Managed Height | Approximately 5–7 ft with selective pruning |
| Mature Width | Approximately 4–6 ft |
| Best USDA Zones | Zones 9–11 |
| Zone 8b–9a Use | May be grown as a warm-season crop with a long frost-free season and substantial winter protection |
| Sun Requirements | Full sun; at least 6–8 hours for strongest root production |
| Soil | Loose, well-drained sandy loam or amended Florida sand |
| Preferred Soil pH | Adaptable from approximately 4.5–7.0; strongest performance commonly occurs around 5.5–6.5 |
| Water Needs | Moderate during establishment; drought-tolerant once rooted |
| Cold Hardiness | Frost-tender; foliage and stems may die back after frost |
| Growth Habit | Fast-growing, upright-to-spreading shrub with an open tropical canopy |
| Spacing | Approximately 4–5 ft apart for home gardens and food forests |
| Wind Tolerance | Moderate once established; tall stems may lodge or snap during severe storms |
| Salt Tolerance | Low to moderate; protect from direct salt spray and saline irrigation |
| Typical Harvest Window | Approximately 8–11 frost-free months after planting |
| Primary Harvest | Starchy storage roots |
| Pollination Required | No—root production does not depend on flowering or pollination |
| Primary Culinary Strength | Dense, savory roots that hold together well when properly boiled |
| Food-Safety Requirement | All roots must be thoroughly peeled, prepared and cooked before eating |
🍠 Why Grow Cuban Cassava?
⭐ A Serious Food Crop With Backyard-Garden Energy
- Exceptional boiling quality: Firm flesh is less likely to disintegrate in soups and stews.
- Authentic Caribbean flavor: Savory, earthy and rich without needing to be overly sweet.
- High-value staple crop: Produces calorie-dense roots in climates where many conventional vegetables struggle.
- Florida heat performance: Cassava continues growing through hot, humid summers.
- Drought resilience: Established plants tolerate dry periods better than many common garden crops.
- Useful in challenging soils: Cassava can grow in sandy and moderately low-fertility ground when drainage is good.
- Easy to propagate: Mature stems can become the following season’s crop.
- Food-forest compatible: The open canopy can provide temporary summer shade and chop-and-drop material.
- Ornamental appeal: Deeply divided leaves give the plant a bold, tropical silhouette.
- Flexible harvest: Mature roots can often remain in the ground until needed, provided the soil is not saturated and damaging cold is not expected.
Cassava became one of the world’s major tropical staple crops because it combines dependable carbohydrate production with strong performance in heat, drought and comparatively modest soils.
🌍 From South America to the Caribbean Table
Cassava did not originate in Cuba. Botanical evidence places the species’ native range in tropical South America. From there, Indigenous peoples moved, cultivated and selected cassava throughout tropical America long before European contact.
Across the Caribbean, Taíno and other Arawakan-speaking communities developed sophisticated agricultural and food-processing traditions around cassava. The crop became important for daily meals, preserved travel foods and community food security.
One of its most important preparations was casabe, a thin cassava bread made through careful grating, pressing and cooking. Archaeological evidence includes ceramic griddles associated with cassava processing, while present-day Caribbean cuisines continue to carry this Indigenous agricultural legacy.
Over centuries, Caribbean families and farmers maintained local cassava selections based on:
- Root texture
- Flavor
- Cooking performance
- Stem strength
- Adaptability to local soils
- Resistance to drought and storms
- Ability to remain intact in boiled dishes and stews
The result is not one genetically identical Cuban cultivar, but a living agricultural tradition maintained through cuttings and shared between households, farms and communities.
This is edible history with roots—literally.
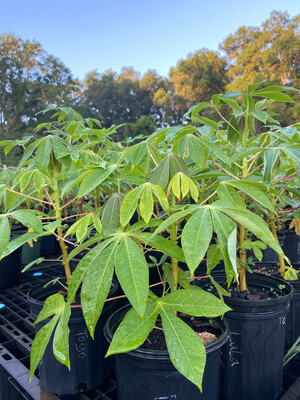
🌴 What Does Cuban Cassava Look Like?
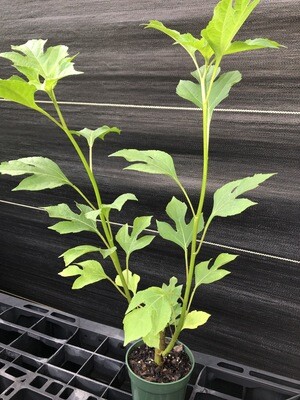
Cuban Cassava brings a distinctly tropical form to an edible landscape.
Defining Characteristics
- Large, palmately divided leaves with narrow lobes
- Open, airy canopy rather than dense hedge-like foliage
- Pale green, tan or whitish mature stems
- Upright central stems that branch as they mature
- Smooth young growth that becomes woody with age
- Milky latex released when stems or leaves are cut
- Thick storage roots developing beneath the soil near the plant’s crown
The plant can be used as:
- A seasonal tropical backdrop
- A loose edible screen
- A temporary nurse plant
- A food-forest transition plant
- A warm-season specimen in mixed edible beds
- A renewable source of propagation canes
Because it may lose foliage or die back following frost, Cuban Cassava should not be treated as a permanent evergreen focal point in colder parts of Florida or the Southeastern United States.
🍽️ Flavor, Texture & Kitchen Performance
Cuban Cassava is prized primarily for its firm texture and savory cooking quality.
| Characteristic | What to Expect |
|---|---|
| Flavor | Traditional savory yuca flavor with mild earthy and nutty notes |
| Raw Flesh Color | White to creamy white |
| Cooked Flesh | Creamy white, dense and starchy |
| Texture | Firm and substantial when properly cooked |
| Moisture Level | Generally less watery than softer selections |
| Cooking Behavior | Holds its form well in soups, stews and boiled preparations |
| Sauce Pairing | Absorbs garlic, citrus, herbs, broth and spices beautifully |
| Root Shape | Commonly elongated or cylindrical, although shape varies with soil and genetics |
| Best Culinary Role | Boiling, stews, soups, mashed dishes, mojo preparations and thick-cut fries |
Best Uses
- Cuban yuca con mojo
- Dominican sancocho
- Puerto Rican root-vegetable stews
- Haitian bouillon
- Haitian tomtom-style preparations
- Trinidadian and Jamaican soups
- Boiled yuca with garlic and citrus
- Mashed cassava
- Thick yuca wedges
- Yuca fries
- Cassava dumplings
- Traditional breads and fermented preparations when processed by experienced cooks
When to Choose Cuban Cassava
Cuban Cassava is an excellent choice when firmness and shape retention matter most. Softer selections may be preferable when the goal is an especially creamy mash or a root that breaks down quickly during cooking.
🍠 GreenDreams Cassava Comparison
These descriptions reflect GreenDreams’ growing and culinary observations. Performance can vary with plant maturity, weather, soil, harvest timing and preparation.
| Selection | Flavor & Texture | Best Kitchen Uses | Plant Character |
|---|---|---|---|
| Cuban Cassava | Savory, firm, dense and traditional | Boiling, mojo, soups, sancocho and stews | Broad, branching Caribbean-type plant |
| CMC40 Cassava | Slightly sweeter and generally softer | All-purpose cooking, baking, roasting and fries | Productive, vigorous multipurpose selection |
| Togo Cassava | Smooth, creamy interior with a slightly sweeter finish | Frying, chips, wedges and high-heat roasting | Fast-growing and especially easy to multiply |
Pick Cuban Cassava When You Want:
- Roots that remain substantial after boiling
- Traditional Caribbean yuca flavor
- A dependable soup and stew selection
- Thick stems for future propagation
- A classic food-forest staple
- An edible crop with strong cultural history
🍋 The Classic Preparation: Yuca con Mojo
Few preparations showcase Cuban Cassava better than yuca con mojo.
Basic Method
- Peel the root completely.
- Remove the thick brown exterior and the pinkish or cream-colored layer beneath it.
- Cut the peeled root into manageable sections.
- Rinse the pieces thoroughly.
- Place them in a large pot with plenty of fresh water.
- Boil until every piece is completely tender and easily pierced through the center.
- Drain and discard all cooking water.
- Remove any tough central fibers.
- Top with a cooked mixture of garlic, onion, olive oil and sour orange—or a blend of orange and lime juice.
The finished dish should be tender and creamy inside while still holding recognizable pieces.
Flavor Pairings
Cuban Cassava works especially well with:
- Garlic
- Sour orange
- Lime
- Cilantro
- Culantro
- Oregano
- Cumin
- Black pepper
- Sautéed onions
- Slow-cooked meats
- Beans
- Hearty vegetable broths
⚠️ Cassava Food Safety — Please Read Before Eating
All cassava contains naturally occurring cyanogenic glycosides, primarily linamarin and lotaustralin. Raw or improperly processed cassava can release cyanide and may cause severe illness.
Cyanogenic content varies with genetics, plant age, drought, nutrition and environmental stress. It cannot be safely determined by the plant’s common name, stem color or a casual taste test.
Never:
- Eat cassava root raw
- Taste raw root to judge whether it is safe
- Eat the peel
- Eat undercooked cassava
- Reuse cassava boiling water
- Assume roasting or air-frying raw pieces replaces proper preparation
- Feed raw roots, peels, stems or leaves to pets or livestock
- Prepare unknown or intensely bitter cassava without an established detoxification method
For Fresh-Cooking Cassava
- Peel thoroughly.
- Cut into manageable pieces.
- Rinse well.
- Boil in ample fresh water until completely tender throughout.
- Drain and discard all cooking water.
- Bake or fry only after the root has been properly boiled.
There is no universal boiling time that guarantees safety for every root. Piece size, root age and cyanogenic concentration vary.
Sweet or fresh-cooking cassava can generally be made safe through thorough peeling and cooking. Bitter or unknown cassava may require more intensive traditional processing, including grating, soaking, fermenting, pressing and drying.
What About Cassava Leaves?
Cassava leaves are consumed in some cultures, but they also contain cyanogenic compounds and require specialized processing.
GreenDreams does not recommend casual experimentation with cassava leaves.
When uncertainty exists, do not consume the plant material.
🌾 Nutritional & Commercial Uses
Properly cooked cassava root is primarily a source of starch and dietary energy. It also supplies some vitamin C and minerals, although it is naturally low in protein and should be eaten as part of a balanced diet.
Pure cassava products are naturally gluten-free, but prepared flours and foods should still be checked for additives or cross-contamination when dietary restrictions apply.
Beyond home cooking, cassava is used worldwide to produce:
- Tapioca starch
- Cassava flour
- Fermented foods
- Animal feed after proper processing
- Laundry and industrial starch
- Adhesives
- Paper and textile products
- Biofuel and industrial alcohol
- Biodegradable materials
SEASONAL CARE, TRANSPLANTING, WATERING, CONTAINERS & PRODUCTION
🌱 Growing Cuban Cassava in Florida and the Southeastern United States
Cuban Cassava is a heat-loving tropical perennial, but growers in cooler regions often manage it as a long-season annual.
It is not truly deciduous in the same way that a peach, plum or temperate fruit tree is deciduous. In warm, frost-free weather, cassava may remain leafy for much of the year. Cool temperatures, drought, transplant stress and frost can trigger yellowing, leaf drop or complete top dieback.
That seasonal change is often normal.
🌦️ Seasonal Growth Guide
| Season | Florida & Similar Zone 9–10 Expectations | Grower Actions |
|---|---|---|
| Spring | Dormant roots and surviving stems begin producing new shoots as soil temperatures rise. Newly planted cassava enters rapid establishment. | Plant after frost danger, resume watering, apply a light compost top-dressing and remove only clearly dead wood. |
| Summer | Fast canopy development and active storage-root formation. Plants may grow several feet in one season. | Maintain mulch, control weeds, monitor water and avoid excessive nitrogen. |
| Fall | Root bulking continues. Older leaves may yellow naturally as growth slows. Early spring plantings may reach harvest maturity. | Harvest mature plants as needed, save healthy stems and prepare for cold protection. |
| Winter | Zone 10–11 plants may remain active. Zone 9 plants may yellow, drop leaves or die back after frost. | Mulch the crown, reduce irrigation, stop heavy feeding and save valuable stem material before severe freezes. |
What Spring Recovery Looks Like
After winter, new growth may emerge from:
- Living upper stems
- Lower woody stems
- The crown near soil level
- Protected underground portions of the plant
Do not assume a frost-damaged cassava plant is dead immediately. Wait for reliably warm spring weather before removing the crown.
When Cuban Cassava May Be Unavailable
GreenDreams may have limited availability during colder or dormant periods because:
- Plants may be leafless.
- Stems may have been harvested for propagation.
- Young spring growth may not yet be ready to ship.
- Frost-damaged tops may require time to regenerate.
A leafless cassava plant during winter is not automatically unhealthy, although active new growth is preferred for shipping whenever possible.
🌞 Where to Plant Cuban Cassava
Best Location
Choose a site with:
- At least 6–8 hours of direct sun
- Loose, well-drained soil
- Good air movement
- Approximately 4–5 ft of growing space
- Easy harvest access
- Protection from direct salt spray
- No standing water following heavy rain
Avoid Planting:
- In low, chronically wet areas
- Directly beside downspouts
- Beneath dense tree shade
- Against foundations
- Above underground utilities
- Beside buried irrigation pipes
- In compacted construction fill
- In heavily irrigated beds containing moisture-loving plants
- Along an exposed beachfront receiving regular salt spray
Cassava can tolerate modest soils, but it does not tolerate saturated ground. Excess water is one of the quickest ways to lose the root system or spoil developing storage roots.
🌿 After Your Cuban Cassava Arrives
Shipping temporarily changes a plant’s light, temperature, humidity and moisture conditions.
Allow the Plant to Recover Before Transplanting
GreenDreams recommends keeping Cuban Cassava in its original container for:
- Approximately 30 days, or
- Until healthy new growth appears and the plant has clearly recovered from shipping stress
During acclimation:
- Place the plant in bright shade for the first several days.
- Gradually introduce direct morning sun.
- Transition toward full sun over one to two weeks.
- Check soil moisture daily.
- Water only at soil level.
- Do not fertilize a visibly stressed plant.
- Do not transplant while the leaves are severely wilted or dropping from shipping stress.
The plant is ready for transplanting when it is holding its leaves, producing fresh growth and using water normally.
🌱 How to Transplant Your Cuban Cassava Plant
Unlike a dormant cassava stake planted directly into the ground, your GreenDreams Cuban Cassava arrives as an actively rooted plant in a 1-gallon nursery container.
The root ball should be transplanted intact so the plant can continue establishing without unnecessary root disturbance.
Best Time to Transplant
The strongest transplanting window is during consistently warm weather after the danger of frost has passed.
In Central Florida and similar climates, spring through early summer provides the longest season for:
- Canopy development
- Stem maturation
- Storage-root formation
- Future cane production
Cassava may also be planted during warm fall weather in frost-free areas, but the plant may have less time to establish before cold temperatures arrive.
Prepare the Planting Site
Before removing the plant from its container:
- Clear weeds from a 3–4 ft area.
- Loosen compacted surface soil.
- Confirm that water drains from the location.
- Identify any buried irrigation, pipes or utility lines.
- Make sure the future root harvest can be dug without damaging permanent landscape features.
Step-by-Step Cassava Transplanting Instructions
- Water the nursery container thoroughly.Water several hours before planting so the root ball is evenly moist and less likely to crumble.
- Prepare a wide but shallow planting hole.Dig the hole only slightly wider than the nursery pot and no deeper than the existing root ball.
- Remove the container carefully.Support the plant near the soil line and slide the pot away from the roots. Avoid pulling the plant by its stem.
- Keep the root ball together.Do not aggressively shake away the potting mix or bare-root the plant. Preserving the young feeder roots helps Cuban Cassava resume growth more quickly.
- Inspect for circling roots.If the roots are tightly circling the outside of the root ball, gently loosen only the outermost roots with your fingers. Do not tear apart the entire root system.
- Position the plant high and tight.Set the top of the root ball level with the surrounding soil in sandy, well-drained ground.
- Raise the plant slightly in heavier soil.In heavier soil or areas that remain wet following rain, position the root ball approximately 1 inch above the surrounding grade and gently mound soil toward it.
- Do not bury the stem.Keep the original nursery soil line visible. Planting cassava too deeply can trap moisture against the stem and contribute to crown or root rot.
- Backfill with loosened native soil.Return the excavated soil around the root ball and gently firm it to eliminate large air pockets.
- Do not compact the soil excessively.Storage roots expand best in loose soil that allows air, water and developing roots to move freely.
- Water slowly at soil level.Thoroughly soak the planting area immediately after transplanting.
- Apply a wide mulch ring.Add approximately 2–3 inches of hardwood mulch around the planting area.
- Keep mulch away from the stem.Leave several inches of open space around the crown to prevent moisture and decay against the plant.
What Not to Add to the Planting Hole
Avoid filling the planting hole with:
- Undiluted manure
- Concentrated fertilizer
- Thick layers of compost
- Dense potting soil
- High-nitrogen lawn products
- Moisture-holding materials that restrict drainage
A light surface application of finished compost, charged biochar, worm castings or an appropriate organic fertilizer may be added after the plant begins producing active new growth.
💧 Watering Cuban Cassava After Transplanting
GreenDreams Watering Standard
Always water at soil level, preferably during the morning.
Avoid overhead watering. Wet foliage—especially during hot afternoons—can contribute to spotting, sunscald, uneven drying and disease pressure.
Drip irrigation or a slow hose application is preferable to overhead sprinklers.
| Establishment Stage | Suggested Watering |
|---|---|
| First 1–2 Weeks in Ground | Water deeply every 1–3 days depending on heat, rainfall and soil drainage |
| Weeks 3–6 | Water approximately 2–3 times per week when rainfall is insufficient |
| Established Plants | Water deeply during extended dry periods; allow the upper soil to partially dry |
| Severe Heat or Drought | Inspect the root zone regularly and irrigate based on soil moisture |
| Cool or Dormant Weather | Reduce watering substantially |
| Container Plants | Check daily and water when the upper soil begins drying |
Always check the soil before watering. Cassava tolerates occasional dryness better than prolonged saturation.
Signs Cuban Cassava Needs Water
- Leaves drooping during the cooler morning hours
- Leaf edges curling inward
- Dry soil several inches below the surface
- Slow or stalled new growth
- Premature loss of multiple leaves
Temporary afternoon drooping during extreme heat does not always mean the plant needs more water. If the leaves recover by morning and the soil remains moist below the surface, additional irrigation may not be necessary.
Signs of Too Much Water
- Continually wet soil
- Yellowing throughout the canopy
- Soft or darkened stem base
- Sour-smelling soil
- Sudden collapse despite wet ground
- Soft, discolored or rotting roots
Cassava prefers a cycle of moisture followed by partial drying—not permanently saturated soil.
🌾 Soil and Fertility
Ideal Soil Structure
Cuban Cassava forms its best storage roots in soil that is:
- Loose
- Aerated
- Deep enough for root expansion
- Well drained
- Free of compacted layers
- Moderately fertile rather than excessively rich
Florida sand can work well when organic matter is maintained at the surface. Heavy clay should be loosened, mounded or converted into a raised planting area.
Fertility Schedule
At Planting
- Apply compost primarily as a surface top-dressing.
- Avoid concentrated fertilizer directly against roots.
- Mulch the surrounding soil.
- Allow the transplant to resume active growth before feeding heavily.
Four to Six Weeks After Transplanting
- Apply a light organic fertilizer if the plant is actively growing.
- Favor a balanced or root-crop-oriented product.
- Avoid high-nitrogen lawn fertilizer.
- Water the soil after applying dry nutrients.
During Summer Root Bulking
- Apply a second light feeding only when plant growth or leaf color indicates a need.
- Maintain potassium and overall mineral balance.
- Use a soil test before making aggressive nutrient corrections.
- Continue adding organic matter to the soil surface rather than disturbing the developing roots.
Avoid Excessive Nitrogen
Too much nitrogen can create:
- Very tall, soft growth
- Oversized foliage
- Increased wind damage
- Delayed root bulking
- Reduced harvest efficiency
The goal is not to grow the largest possible cassava shrub. The goal is to produce a healthy canopy that powers a strong underground harvest.
✂️ Pruning Cuban Cassava
Cassava does not require constant pruning.
Recommended Approach
- Allow the young plant to establish before making major cuts.
- Remove weak, broken or crossing stems.
- Tip-prune exceptionally tall plants around 5–7 ft when height control is necessary.
- Avoid repeated hedge-style pruning.
- Save major cutting for harvest or propagation time.
- Use clean tools to prevent introducing disease into stems.
- Wear gloves when working with cut stems and milky sap.
Heavy, repeated pruning reduces leaf area and may reduce the energy available for storage-root production.
Before Storm Season
For exposed plants:
- Remove dead or damaged stems.
- Secure young, top-heavy plants with a loose support.
- Reduce excessive height before a forecast storm when practical.
- Avoid rigid staking that prevents all natural movement.
Cassava’s open leaves allow some wind to pass through, but tall woody stems can still bend, split or lodge during tropical storms.
🪴 Growing Cuban Cassava in Containers
A 1-gallon nursery pot is intended for establishment and shipping. It is not a long-term production container.
Cassava can be maintained temporarily in containers, but meaningful storage-root production requires substantially more soil volume.
Container Progression
| Current Size | Suggested Next Step | Purpose |
|---|---|---|
| 4-Inch Starter | Move into a 1-gallon pot | Early establishment |
| 1-Gallon Plant | Move into a 3-gallon pot | Short-term growth and recovery |
| 3-Gallon Plant | Move into a 7-gallon pot | Transitional growing |
| 7-Gallon Plant | Move into a 15–25+ gallon container | Limited container root production |
| Mature Production Plant | Large grow bag, raised bed or open ground | Best storage-root development |
Increase container size gradually rather than moving a small root ball directly into an enormous volume of wet soil.
When to Up-Pot
Transplant when:
- Roots circle the inside of the pot.
- Roots emerge through drainage holes.
- The container dries unusually quickly.
- Growth slows despite proper care.
- The plant becomes top-heavy.
- Water runs around the root ball without soaking into it.
How to Up-Pot Cuban Cassava
- Water the plant several hours before transplanting.
- Choose a container one or two practical sizes larger.
- Confirm that the new container has generous drainage holes.
- Add enough potting mix to keep the existing root ball at the same depth.
- Slide the root ball from the original container.
- Gently loosen only tightly circling outer roots.
- Center the plant in the new pot.
- Fill around the root ball without burying the stem.
- Firm the mix lightly.
- Water thoroughly at soil level.
- Keep the plant in bright shade for several days before returning it gradually to full sun.
Container Potting Mix
Use a loose, fast-draining mix rather than a dense, moisture-retentive blend.
A practical cassava mix may contain:
- High-quality potting soil or coconut coir
- Composted pine bark or bark fines
- Perlite, pumice or coarse horticultural material
- A modest amount of finished compost
The final mix should drain freely while retaining enough moisture to support active summer growth.
Avoid:
- Straight garden soil
- Dense peat-heavy mixes without aeration
- Containers without drainage holes
- Permanently wet saucers
- Heavy clay
- Excessive manure
- High-nitrogen compost blends
Containers, grow bags and potting materials can often be found through independent nurseries, landscape-supply businesses, hydroponic stores, farm suppliers and online garden retailers.
Helpful search terms include:
- Food-grade large grow bags
- Root-crop containers
- Professional nursery pots
- Fast-draining tropical potting mix
- Pine bark fines
- Horticultural perlite or pumice
🏠 Can Cuban Cassava Grow Indoors?
Cuban Cassava is not an ideal permanent houseplant.
It requires:
- Intense light
- Warm temperatures
- Significant vertical space
- A large root zone
- Strong airflow
- Room for a broad canopy
Indoor plants commonly become stretched and weak without powerful supplemental lighting.
Better Indoor Uses
In colder climates, growers may temporarily maintain:
- A compact mother plant
- Rooted stem cuttings
- Dormant propagation canes
- A recently shipped plant recovering from severe weather
A greenhouse, sunroom or bright frost-free structure is more suitable than a typical living room.
Indoor growing may preserve planting stock, but substantial storage-root production is unlikely without greenhouse-level light and container volume.
🌿 Use Your Cuban Cassava Plant to Grow Future Crops
One of cassava’s greatest benefits is its ability to produce both an edible root harvest and the planting material for the following season.
Cassava is normally propagated from sections of mature stem called:
- Stakes
- Canes
- Setts
- Stem cuttings
The harvested storage roots are not used to produce the next crop.
Do Not Cut the New Plant Immediately
The 1-gallon plant should not be divided or cut apart immediately after purchase.
Allow it to grow until the stems are:
- Approximately 8–12 months old
- Firm and woody rather than soft and green
- Approximately thumb-thick or larger
- Healthy and free from visible pests or disease
- Well developed below the soft, leafy upper canopy
A mature Cuban Cassava plant may produce several usable canes. Each cane can be divided into multiple planting stakes, allowing one original plant to become an expanding patch over several growing seasons.
🌱 Best Time to Collect Cassava Canes
Stem material is commonly collected:
- When mature roots are harvested
- Before a damaging winter freeze
- After approximately 8–12 months of active growth
- While the stems remain firm, healthy and viable
- Before prolonged cold or storage causes the canes to dry out
Cut and label the planting canes before digging the roots so the cultivar name is not lost.
Cassava is clonally propagated. Each new plant grown from a healthy stem cutting should maintain the primary characteristics of the parent plant.
Before Cutting
Prepare:
- Clean, sharp hand pruners
- Loppers or a pruning saw for thick canes
- Gloves
- Plant labels
- A permanent nursery marker
- A clean container or tarp for separating cultivars
Clean cutting tools before beginning and between plants when collecting from several cassava selections.
✂️ How to Cut Cuban Cassava Propagation Stakes
Select the Best Part of the Stem
Choose mature wood from the lower-to-middle portion of a healthy cane.
The best propagation material is generally found:
- Above the oldest, heavily weathered stem base
- Below the soft, leafy green tip
- In the firm section where the stem has developed visible nodes
- On stems that supported healthy foliage during the growing season
Avoid using:
- Soft green branch tips
- Very thin stems
- Severely cracked or dried stems
- Sections with insect damage
- Stems with soft spots
- Blackened or discolored tissue
- Material from plants showing unexplained disease symptoms
Identify the Nodes
Cassava nodes appear as raised rings or leaf-scar markings around the stem.
Each node contains buds capable of producing shoots and roots.
Prepare Each Stake
- Use clean, sharp pruners, loppers or a pruning saw.
- Cut the mature cane into sections approximately 8–12 inches long.
- Include at least 5–7 healthy nodes whenever stem spacing allows.
- Keep track of which end originally pointed upward.
- Make the bottom cut straight and the top cut angled—or clearly mark the top with a nursery pen.
- Label every group of stakes as Cuban Cassava.
- Keep the cuttings shaded while preparing the planting area.
- Plant freshly prepared stakes promptly for the strongest establishment.
Why Orientation Matters
A cassava stake planted upside down may:
- Sprout slowly
- Produce weak or curved shoots
- Establish an inefficient root system
- Rot before strong growth begins
- Fail completely
Marking the top before dividing a long cane prevents confusion later.
🌱 How to Plant Cuban Cassava Stem Sections
Preferred Florida Method: Upright or Slightly Angled
Vertical or slightly angled planting works especially well in Florida’s humid climate because a substantial portion of the stake remains above the soil.
This reduces the amount of stem exposed to saturated ground and makes it easier to recognize proper orientation.
Step-by-Step Stake Planting
- Choose a sunny, well-drained location.
- Remove weeds and loosen the planting area.
- Identify the original top and bottom of the stake.
- Place the original bottom end into the soil.
- Insert the stake approximately 2–4 inches deep.
- Leave several healthy nodes above the soil line.
- Position the stake vertically or at a slight angle.
- Firm the soil around the buried section.
- Water thoroughly at soil level.
- Maintain even—but not saturated—moisture while shoots and roots develop.
- Space future production plants approximately 4 ft apart.
- Wait for active shoot growth before applying fertilizer.
Why Not Bury the Entire Stake?
Partially exposed stakes are generally less vulnerable to:
- Rot in saturated soil
- Excessive fungal pressure
- Loss from heavy summer rainfall
- Incorrect orientation
- Damage during weeding
For most GreenDreams growers, upright or slightly angled planting is the preferred method.
🌿 Optional Horizontal Planting Method
Cassava can also be planted horizontally.
How to Plant Horizontally
- Dig a shallow trench approximately 2–4 inches deep.
- Lay the entire stake flat.
- Cover it completely with loose soil.
- Firm the soil lightly.
- Water gently at soil level.
- Keep the bed evenly moist until shoots appear.
Potential Benefits
- Several nodes may produce shoots.
- Multiple stems may emerge from one cutting.
- Shallow root development may simplify harvesting in some soils.
- The method can perform well in loose raised beds or seasonally dry climates.
Potential Drawbacks in Florida
- Completely buried stakes may rot in saturated soil.
- Several shoots can create crowding.
- Shoots may emerge unevenly.
- Shallow planting material may be disturbed by animals or cultivation.
- Multiple stems can complicate plant spacing.
Horizontal planting can work, but upright or slightly angled planting is usually more dependable in humid Florida conditions.
💧 Watering Newly Planted Cassava Stakes
Fresh, unrooted stakes should not be allowed to dry out completely, but excessive water can cause them to rot before roots develop.
Establishment Guidelines
- Water immediately after planting.
- Check the soil regularly during the first several weeks.
- Keep the soil lightly and evenly moist.
- Water during the morning.
- Apply water directly to the soil.
- Do not use overhead sprinklers.
- Do not leave the planting area saturated.
- Reduce irrigation once strong shoots and roots are established.
A stake without roots cannot use large amounts of water. The goal is to prevent dehydration without creating a wet environment that encourages decay.
When New Growth Appears
Once the stake begins producing healthy shoots:
- Continue providing full sun.
- Remove competing weeds.
- Maintain a light mulch layer.
- Keep mulch away from the emerging stems.
- Select one to three strong shoots if numerous weak shoots emerge.
- Begin a light organic fertility program only after active growth is underway.
- Increase watering gradually as the canopy expands.
Do not repeatedly dig around the plant to inspect root development. Storage roots form near the base and can be damaged by cultivation.
🔁 Turning One Cuban Cassava Plant Into a Renewable Crop
A mature Cuban Cassava plant can provide:
- Edible storage roots for the kitchen
- Several mature stems
- Multiple planting stakes from each usable stem
- New plants for the following growing season
- Extra planting material for an expanded production row
- Propagation canes to share with other knowledgeable growers
Simple Harvest-to-Replant Cycle
- Grow the original Cuban Cassava for approximately 8–12 frost-free months.
- Select and label healthy mature stems.
- Cut the stems before digging the roots.
- Divide the stems into 8–12-inch propagation stakes.
- Preserve the correct top and bottom orientation.
- Replant the stakes upright or at a slight angle.
- Maintain consistent—but not excessive—moisture during establishment.
- Allow the new plants to mature through the following warm season.
- Save new canes at the next harvest.
- Repeat the process each growing season.
With correct labeling, healthy planting material and enough growing space, one Cuban Cassava plant can become the foundation of a long-term, self-renewing staple crop.
🍠 Root Development and Harvest
Typical Harvest Timing
- Florida: Commonly 8–11 months after spring planting
- South Florida and Frost-Free Areas: Harvest timing may be extended
- Zones 8–9: Harvest before damaging freezes when the growing season is limited
- Container Plants: Usually produce smaller or fewer roots than plants grown in open soil
Signs the Crop May Be Ready
- The plant has completed at least eight months of active growth.
- Lower leaves are naturally yellowing.
- Canopy growth is beginning to slow.
- Stems have become firm and woody.
- Soil near the crown begins cracking or lifting.
- Sample roots have reached a useful diameter.
How to Harvest Cuban Cassava
- Stop watering several days before harvest when weather and soil conditions allow.
- Cut the upper stems before disturbing the roots.
- Save healthy mature stem sections for propagation.
- Label all saved planting canes.
- Remove mulch from around the plant’s crown.
- Loosen the soil well away from the central stem.
- Work gradually toward the plant to avoid slicing through storage roots.
- Lift the crown carefully.
- Remove storage roots without excessive bruising.
- Harvest only what can be processed promptly.
- Replant selected stem stakes for the next crop.
Use Freshly Harvested Roots Quickly
Cassava roots deteriorate rapidly once removed from the ground. Internal discoloration may begin within approximately 24 hours, followed by microbial decay.
For best quality:
- Process freshly harvested roots within 24–48 hours.
- Peel and cook them promptly.
- Freeze properly prepared portions for longer storage.
- Do not consume roots showing internal blue, black, brown or rotted areas.
🌿 Cuban Cassava Food-Forest Guild
Cassava does not need pollinators to produce storage roots, but companion planting can improve soil cover, biodiversity and long-term soil health.
Nitrogen-Supporting Plants
- Pigeon pea
- Sunn hemp
- Cowpea
- Perennial peanut in managed areas
- Other nonaggressive legumes suited to the site
Chop-and-Drop Biomass Plants
- Mexican sunflower
- Clumping grasses
- Vetiver planted away from the harvest zone
- Lemongrass
- Pigeon pea
- Banana leaves and chopped pseudostem material
Pollinator and Beneficial-Insect Plants
These plants do not directly increase cassava root production, but they support the surrounding edible ecosystem:
- African blue basil
- Native salvia
- Tropical sage
- Roselle
- Cranberry hibiscus
- Sweet almond bush
- Flowering culinary herbs
Guild Layout Tip
Maintain at least 2–3 ft of relatively open soil around the cassava crown.
Dense companion roots can:
- Compete with developing storage roots
- Complicate harvesting
- Hide pests near the stem
- Increase the chance of damaging neighboring plants during harvest
Use low groundcovers near the outer edge of the bed and place taller biomass plants where they will not shade the cassava canopy.
CAUTIONS, TROUBLESHOOTING, FAQ & SHIPPING
⚠️ Important Cautions
Food Safety
- Every cassava root must be properly peeled and cooked.
- Raw and undercooked cassava can be toxic.
- Do not eat cassava leaves without specialized processing knowledge.
- Never feed raw cassava material to pets or livestock.
- Discard all boiling water.
- Do not rely on taste, stem color or a common name to determine safety.
Plant Sap
Cassava is a member of the Euphorbiaceae family and produces milky latex when cut.
- Wear gloves when pruning or harvesting.
- Avoid contact with eyes and broken skin.
- Wash tools and hands after handling.
- Keep cut stems away from children and pets.
Landscape Management
Cassava is not generally considered an aggressive invasive plant in managed gardens, but discarded stem sections may root in warm, moist soil.
Dispose of unwanted stems intentionally rather than leaving them in irrigated beds.
Drainage
Do not plant Cuban Cassava in standing water. Saturated ground can rot:
- Feeder roots
- The crown
- Propagation stakes
- Developing edible storage roots
Storm Exposure
Mature stems can become top-heavy. Avoid planting tall cassava where falling stems could damage:
- Windows
- Vehicles
- Walkways
- Pool enclosures
- Fragile ornamental plants
🔍 Cuban Cassava Troubleshooting Guide
Icons represent common conditions and organic recovery options—look for 🌿 for corrective care.
| ⚠️ Issue | 🧠 Likely Cause | 🌿 Organic Response |
|---|---|---|
| 🍂 Older lower leaves yellowing | Normal aging, seasonal slowdown or mild drought | Check soil moisture and remove only fully yellow leaves |
| 🍂 Widespread yellowing | Overwatering, poor drainage or nutrient imbalance | Allow the soil to dry partially, inspect drainage and consider a soil test |
| 🫣 Curled or drooping leaves | Dry root zone, heat, wind or transplant stress | Water deeply at soil level and provide temporary wind protection |
| ☀️ Pale or scorched leaves after shipping | Sudden exposure to intense sunlight | Return the plant to bright shade and acclimate it gradually |
| 🌱 Very slow new growth | Cool weather, shade, transplant stress or crowded roots | Increase warmth and light; check whether the plant is root-bound |
| 🌿 Huge canopy but weak root harvest | Excess nitrogen, shade, crowding or harvesting too early | Reduce nitrogen, increase sun exposure and allow more root-bulking time |
| 💦 Soft stem base | Excess water or developing stem rot | Reduce irrigation and improve drainage immediately |
| 🍄 Rotting storage roots | Saturated soil, damaged roots or delayed harvest in wet ground | Harvest affected plants, discard rotten tissue and correct drainage |
| 🕷️ Fine stippling or webbing | Spider mites, often during hot, dry weather | Inspect leaf undersides and use a labeled organic treatment when necessary |
| 🪲 Sticky leaves or cottony insects | Whiteflies, scale or mealybugs | Remove heavily infested growth and apply a labeled insecticidal soap or oil |
| 🐜 Increasing sap-sucking pests | Ants protecting aphids, scale or mealybugs | Manage ants and treat the sap-sucking insects directly |
| 🌬️ Leaning or broken stems | Storms, weak growth or excess nitrogen | Stake young plants loosely and prune damaged stems cleanly |
| ❄️ Brown or collapsed canopy | Frost damage | Mulch the crown and wait for warm weather before removing major stems |
| 🌱 Cuttings fail to sprout | Immature stem, incorrect orientation, rot or cold soil | Use mature stem sections and replant in warm, well-drained soil |
| 🌱 Stake rots before sprouting | Excess moisture or fully buried cutting in wet soil | Replace it with a healthy stake and plant upright or slightly angled |
| 🍠 Small harvest | Short season, shade, crowding, compacted soil or a young plant | Provide full sun, loose soil, wider spacing and 8–11 months of growth |
🌟 Is Cuban Cassava Right for You?
✅ Ideal For
- Florida and Gulf Coast growers
- Caribbean and Latin American home cooks
- Food-forest and permaculture gardeners
- Homesteaders building staple-crop resilience
- Growers with sandy, well-drained soil
- Gardeners seeking heat-tolerant summer crops
- People interested in renewable propagation material
- Landscapes with enough room for a 6–10 ft tropical shrub
- Growers willing to follow proper food-safety preparation
- Gardeners who want to save canes and replant future crops
❌ May Not Be Ideal For
- Gardens without full sun
- Properties with chronically wet soil
- Very small patios without room for a large container
- Growers wanting a permanent indoor houseplant
- Cold climates without at least eight frost-free months or season extension
- Exposed beachfront sites receiving heavy salt spray
- Anyone unwilling to peel and thoroughly cook every root
- Homes where children or pets may chew unattended plant material
- Gardeners seeking a plant that remains ornamental through every winter
❓ Cuban Cassava FAQ
Is yuca the same as yucca?
No. Yuca is a common name for edible cassava, Manihot esculenta. Yucca refers to a different group of spiky ornamental plants in the genus Yucca.
They are unrelated plants despite the similar spelling.
How long does Cuban Cassava take to produce roots?
Plan on approximately 8–11 frost-free months for a substantial crop. Warm temperatures, full sun, loose soil and adequate spacing support better production.
Can Cuban Cassava grow in Central Florida?
Yes. Central Florida generally offers a suitable growing season, although winter frost may damage the canopy. Plant after frost danger and allow as much warm-season growth as possible.
Can cassava grow in USDA Zone 8?
It can be attempted as a long-season annual in warm Zone 8 locations. Production depends on receiving enough frost-free months. Heavy mulch may protect underground portions during mild winters, but survival is not guaranteed.
Is Cuban Cassava cold-hardy?
No. Cassava is frost-tender. Leaves may yellow and fall during cool weather, and freezing temperatures can kill stems to the ground.
Will Cuban Cassava return after frost?
It may resprout from protected lower stems or the crown if the soil did not freeze deeply. Survival depends on the severity and duration of the cold.
Does Cuban Cassava require another plant for pollination?
No. The edible storage roots form without pollination, so a single plant can produce a crop.
Can Cuban Cassava grow in a pot?
Yes, but a 1-gallon or 3-gallon pot is temporary. Use a container of approximately 15–25 gallons or larger for limited root production. Open ground or a raised bed generally produces a stronger harvest.
When should I transplant the 1-gallon plant?
Wait approximately 30 days after shipping—or until healthy new growth confirms that the plant has recovered. Transplant during warm weather after frost danger.
Should I break apart the root ball when planting?
No. Keep the root ball mostly intact. Gently loosen only tightly circling outer roots.
Can I bury the cassava stem deeper for support?
No. Maintain the original nursery soil line. Planting the stem too deeply can increase the risk of crown and root rot.
Can I plant a cassava root from the grocery store?
Cassava is normally propagated from stem sections. Grocery-store roots are storage organs and generally lack the buds needed to produce a new plant.
When can I take cuttings from my Cuban Cassava?
Wait until the plant has produced firm, mature stems—typically after approximately 8–12 months of active growth.
How long should cassava cuttings be?
Prepare mature stem stakes approximately 8–12 inches long with several healthy nodes.
Which end of the cassava cutting goes into the soil?
Plant the original bottom end in the soil and leave the original top pointing upward. Marking the top before cutting the cane prevents mistakes.
How deeply should I plant a cassava cutting?
Insert the lower end approximately 2–4 inches into loose, well-drained soil.
Can cassava cuttings be planted horizontally?
Yes, but fully buried stakes may be more vulnerable to rot in wet Florida soils. Upright or slightly angled planting is generally preferred.
How many plants can one mature cassava produce?
A mature plant may produce several usable canes, and each cane may be divided into multiple stakes. The exact number depends on stem length, thickness and maturity.
Is Cuban Cassava drought-tolerant?
Established plants are relatively drought-tolerant, but prolonged drought can reduce growth and root yield. Newly planted cassava still requires consistent establishment watering.
Why is my cassava growing leaves but not large roots?
Common causes include:
- Too much nitrogen
- Insufficient sunlight
- Crowding
- Compacted soil
- Excessive water
- Harvesting too early
- Growing in a small container
Can I eat cassava raw?
No. Never eat raw cassava.
Is 15 or 20 minutes of boiling always enough?
No single cooking time guarantees that every cassava root is safe. Roots must be thoroughly peeled, cut and boiled in ample water until completely tender. The cooking water must then be discarded.
Can I bake or air-fry raw cassava?
GreenDreams recommends boiling properly prepared cassava first. Baking, roasting or air-frying can follow after boiling.
Can I eat cassava leaves?
Cassava leaves require specialized processing and are not recommended for casual preparation.
When should I harvest Cuban Cassava?
Harvest commonly begins around eight to eleven months after planting. In colder regions, harvest before severe frost. In Florida, growers may harvest individual plants as needed once the roots mature.
How long do harvested cassava roots last?
Fresh roots deteriorate quickly and should ideally be cooked, processed or frozen within 24–48 hours of harvest.
🚚 Shipping Your 1-Gallon Cuban Cassava
Cuban Cassava ships best to:
- Florida
- The Southeastern United States
- Gulf Coast states
- Texas
We can ship across the continental United States, but buyers in northern and western states should carefully consider transit time and weather.
Shipping Schedule
- Ships from Florida
- UPS Ground service
- Live-plant shipments leave on Mondays
- Plant height and fullness vary with season and nursery pruning
Regional Shipping Advisory
Long UPS Ground transit periods may cause:
- Leaf yellowing
- Leaf drop
- Wilted foliage
- Bent or lightly damaged stems
- Dry potting mix
- Delayed new growth
- Temporary dormancy
These symptoms do not always indicate that the root system is dead. Cassava is capable of regrowing from healthy stems and roots after transit stress.
Extreme Weather Disclaimer
Buyer discretion is required during peak summer heat and winter cold.
GreenDreams cannot guarantee the condition of live plants exposed to:
- Freezing temperatures
- Extreme heat
- Carrier delays
- Extended ground transit
- Packages left outdoors after delivery
- Additional agricultural inspection delays
California packages may occasionally be held for agricultural inspection, adding an extra day or more to transit.
Risk associated with extended UPS Ground transit and extreme temperatures is assumed by the buyer. Larger plants generally handle long-distance shipping better than small starter plants.
After Delivery
- Open the package immediately.
- Check soil moisture.
- Water at soil level if the soil is dry.
- Place the plant in bright shade.
- Gradually return it to full sun.
- Keep it in the original container for approximately 30 days or until healthy new growth appears.
- Do not fertilize or transplant immediately after shipping.
🏡 Shop With Us in Person
GreenDreams Nursery & Farm — Open to the Public
Shop Cuban Cassava and explore countless edible, medicinal, native and ecological plants—many in larger sizes that are not available for shipping.
🌾 18709 US Hwy. 41, Spring Hill, FL 34610
🕘 Tuesday–Friday: 9 AM–5 PM
🌞 Saturday: 8 AM–3 PM
Walk through our regenerative nursery, compare plants in person and see what is actively growing, flowering or fruiting this week.
Our retail inventory changes seasonally, so every visit offers something new.
🌿 Beyond the Plant: GreenDreams Services
At GreenDreams, we do more than grow plants—we design, build and restore productive ecosystems across Florida.
- 🌳 Onsite consultations and edible landscape design
- 🚜 Installation and project management
- 🚚 Bulk delivery of compost, mulch, biochar and soil materials
- 🌾 Wholesale and large-scale regenerative solutions
- 🌴 Food-forest planning and plant selection
- 🌱 Garden revitalization and ecological maintenance
Let our team help you create a thriving edible landscape—starting with Cuban Cassava and building outward into a productive ecosystem.
🌿 IMPORTANT INFORMATION BEFORE PURCHASING LIVE PLANTS
Please note: Plants purchased through our online store are not available for pickup at our retail nursery in Spring Hill, Florida.
Online inventory is housed at a separate facility and is priced, prepared, and handled exclusively for shipping.
🌱 Looking for larger plants or more selection?
Our retail nursery location offers far more availability, including larger sizes, specialty plants, and many selections not suitable for nationwide shipping.
Local pickup is available for retail nursery purchases only.
Visit our Spring Hill, FL retail nursery page to explore in-person shopping options.
🚚 LIVE PLANT SHIPPING & TRANSIT EXPECTATIONS
Live plants naturally experience stress during shipping. Temporary leaf drop, mild wilting, or cosmetic stress is normal after transit. Most plants recover quickly with proper watering, gradual light exposure, and basic aftercare. Some plants may require additional attention during the first few weeks.
Despite careful packing, minor cosmetic damage may occur during transit. Small issues such as broken leaves or stems typically resolve with time and proper care.
If your shipping box arrives with significant external damage, please contact UPS within 30 days to initiate a carrier claim.
⏱️ SHIPPING METHOD, TIMING & TRANSIT WINDOWS
All online orders ship via UPS Ground from our Central Florida nursery.
📦 Shipping Schedule: Orders ship once weekly on Mondays to reduce the risk of packages sitting in transit over weekends. A countdown clock on our website displays the next shipping date.
🚚 Typical Transit Times:
-
Florida: 1–2 days
-
Southern U.S.: approximately 2 days
-
Midwest, West & Northern U.S.: 3–5 business days
Long-distance shipments, particularly to the western U.S., may experience additional transit time due to agricultural inspections in states such as Arizona, California, and Texas.
Extended transit times can be more challenging for small or tender plants and may require additional recovery care after arrival.
🌡️ EXTREME WEATHER & SEASONAL RISK
Live plants are sensitive to temperature extremes.
We cannot guarantee plant condition during periods of extreme summer heat or winter cold and freezing temperatures. Weather-related delays, carrier interruptions, or exposure during delivery are beyond our control.
Customers are responsible for:
-
Monitoring tracking information sent via email
-
Retrieving packages promptly upon delivery
-
Preventing plants from being left outdoors in extreme conditions
During unsafe weather, holiday shipping volume, or extended transit risk, orders may be held and shipped the following week to protect plant health.
⚠️ CUSTOMER RESPONSIBILITY & REFUND POLICY
By purchasing live plants, customers acknowledge and accept the risks associated with shipping, weather exposure, transit delays, and regional suitability.
Refunds or replacements are considered only under exceptional circumstances and in accordance with our return and refund policy. We are not responsible for:
-
Weather-related damage
-
Carrier delays
-
Poor plant selection for a given climate or region
-
Improper care after delivery
Upon purchase, customers assume full responsibility for the ongoing care and success of their plants.
✅ CONSENT & AGREEMENT
By completing a purchase, you confirm that you have read, understand, and agree to all shipping policies, responsibilities, and conditions outlined above.
Our goal is transparency, plant health, and long-term growing success — and we appreciate your understanding and care when ordering live plants.


